
Windows 10 provides good services for gamers. While providing support for older games, Xbox One promises streaming. It’s not as perfect as it was released, though. Some tweaks are required to enjoy the gaming experience that Windows 10 has to offer. There are several ways to optimize your computer for games.
How to improve gaming performance on Windows?
Although Windows 10 is optimized for games, it’s up to you to put it in a better position. For this, you need to perform 5 methods that we will present to you. When you apply these, you will notice that the performance increases while playing games on your computer. We have compiled below the methods to increase the performance of the computer.
Optimize Windows 10 with Gamer mode
Our first way to get the best gaming performance in Windows 10 is to optimize our operating system with game mode. Game Mode is among the most important Windows settings for gaming. To apply this process, you need to complete the following items.
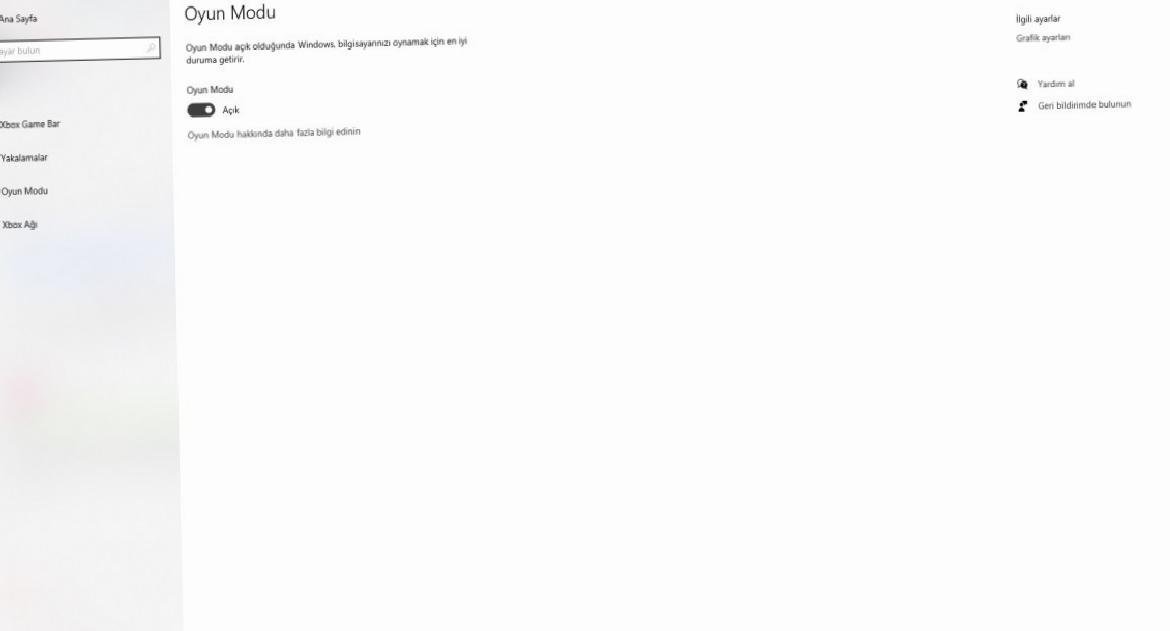
- Press Windows + I keys simultaneously.
- Type ‘Game Mode’ in the search box.
- Click Game Mode settings or Turn on Game Mode.
- On the game screen, click Game Mode.
- To use Game Mode, set the option to ‘On’.
If your computer supports Game Mode, resources are being managed to reach optimum frame rate. In addition, Windows Update hangs. While this is a way to improve gaming performance on Windows 10, it’s still not a great option. That’s not all you need to do.
Disable Nagle algorithm
The Nagle algorithm bundles data packets together at the expense of a smoother internet connection. It’s helpful, but enabling the Nagle algorithm on your computer can cause lag issues when playing online games. To disable this and improve gaming performance in Windows 10, follow these steps:
- Press Windows + X keys simultaneously.
- Select Windows PowerShell from the menu that appears.
- Type ‘ipconfig’ and press ‘Enter’.
- To find out your PC’s IP address, find the ‘IPv4 address’ section.
Log your IP address and switch to the Windows Registry.
- Open Run.
- Type ‘regedit’.
- Click ‘Yes’ on the screen that appears.
- Choose Registry Editor. (Be careful when editing the Windows Registry.)
Copy and paste the following code in the address bar:
HKEY_LOCAL_MACHINESYSTEMCurrentControlSetServicesTcpipParametersInterfaces
In the left pane, you will see a collection of folders with filenames made up of letters and numbers. Match your IP address with the one listed by DhcpIPAddress in one of these folders to access the correct file.
When you find the matching folder:
- Right click on the folder.
- Select New > DWORD (32-bit).
- Call it TcpAckFrequency.
- Click OK.
- Select the new Z DWORD (32-bit) value again.
- Call it TCPNoDelay.
- Double click on each and set their parameters to ‘1’.
Doing this disables the Nagle algorithm. If you encounter any problems, reset the parameter values to ‘0’. Your actions will be disabled.
Use a faster DNS
Network traffic can cause problems if you’re playing online multiplayer or relying on a remote server for Windows 10 games. While switching to faster internet helps, you can also fix the problem by simply making some network settings.
- Press the Windows + I keys simultaneously.
- Search for Network & Internet. Then go to Change Adapter Settings.
- Right click on your wireless network.
- Select Properties.
- Click Internet Protocol Version 4.
- Make a note of the two DNS addresses as they may be useful to you in the future. (So that you can revert back if there is a problem later.)
- Replace these with 1.1.1.1 and 1.0.0.1.
- Click OK and then Close.
- Restart your default browser.
Your internet should be faster now. This will also help you in online games.
Disable automatic updates
Windows 10 is updating your operating system automatically. In addition it plans to reboot without your permission. While this feature isn’t enabled often, you don’t want to be caught unaware and lose your game progress.
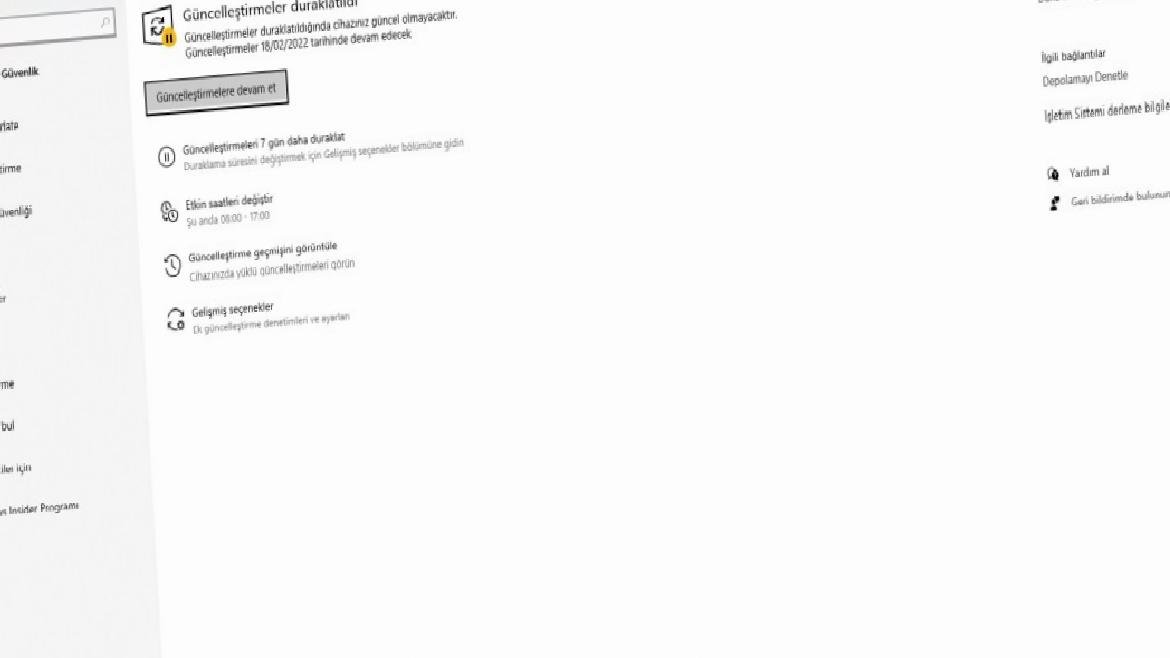
Automatic updates don’t just shut down Windows without warning. Downloading updates in the background limits your network connection. Although you can’t disable auto-restart, you do have the option to delay it. To prevent Windows Update from interrupting your game performance, you need to follow the steps below.
- Open ‘Settings’ with Windows + I keys.
- Click Windows Update in the Update & Security area.
- Enter advanced options and click Update Options.
- Disable Restart this device as soon as possible when a reboot is required to install an update.
- Turn on Show notification. (Windows will display multiple warnings when the system will reboot after an update)
- Click ‘Pause Updates’ to delay the installation of the update for up to 7 days.
By specifying when to use Windows 10, you can prevent Windows updates from being downloaded and installed during active hours.
Disable notifications
First of all, you should not confuse this setting with the above. The Focus Assist feature in Windows 10 allows you to determine how and when you receive notifications. Notifications are often accompanied by pop-ups and chimes. These can also interrupt the games. That’s why it’s important to use Focus Assist here.
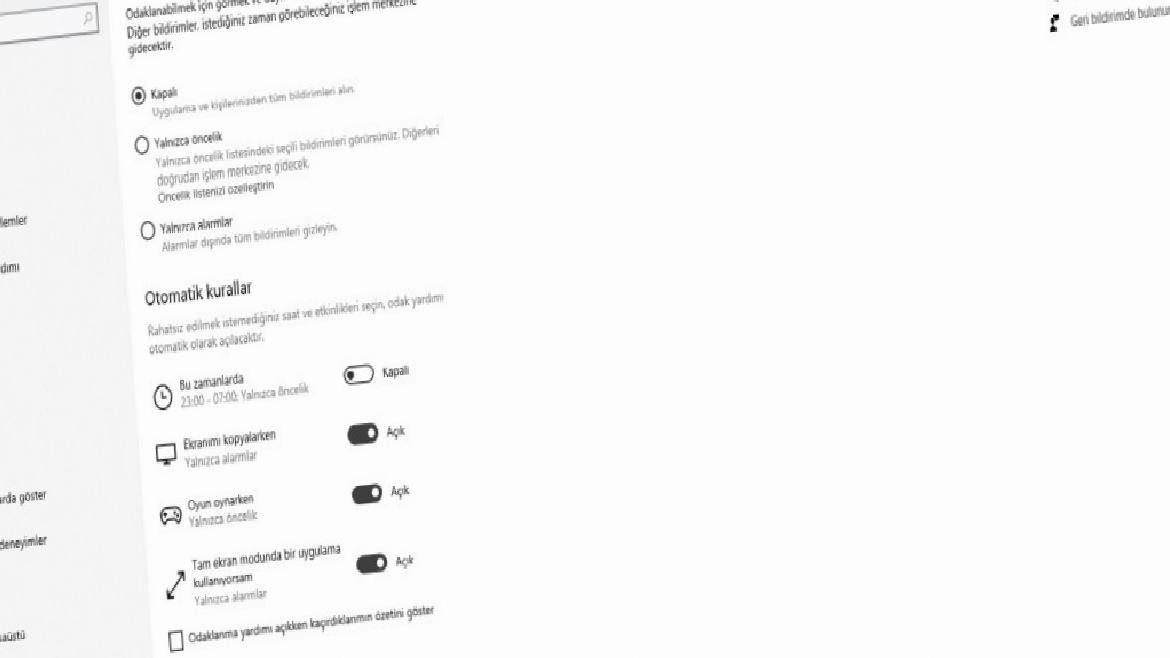
- Press the Windows + I keys simultaneously.
- Enter Focus Assist under System.
- Select Alarms Only to hide all other notifications.
- Make sure the While Gaming option is turned on.
- Close the settings screen.
This will minimize the impact of notifications. This allows them to be checked later.


